I did it! I finally, finally, finally finished refinishing my Chinese Cabinet (at least, that's what Megan calls it). It has taken me since...oh, I'd say, September 2012 to complete this project, but I think it turned out great! I am so pleased about my new addition to our dining room.
It all started when my Aunt Pat brought me boxes of my Grandma's china. I thought that such a lovely gift needed to be displayed in a loving manner and so my search for a china cabinet began.
 |
| Pretty snowflake china from the 60s. |
I had seen people of Pinterest re-do china cabinets and they made it look easy....so, why not? I browsed Craigslist and found this beaut.
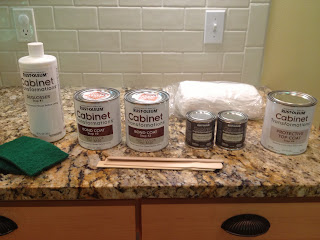
Yeeeesh. Can you say U-G-L-Y, it ain't got no alibi? But it was only $100. First thing I did was make a trip to Home Depot and pick up this bad boy.
 |
| Easy. Quick. All in one box= Good. Actually, I was pretty skeptical. The china cabinet was awfully dark, and this promised to make it very white. |
 |
| Er....That's a lot of steps. Could it be that this might take a few days longer than I expected? |
I disassembled the whole darn thing, every hinge, every screw, every magnetic door-shutting doohickey, and every little plastic bit for keeping the glass windows intact. It was a lot of parts. Then I did the Rustoleum kit step by step. Each side of each piece. It took...awhile.
 |
| Brennan's bug makes a cameo |
I also removed the mirrors that backed the cabinet. It was tricky, but I had a cool little tool that breaks glass without shattering it. I then had to peel of this horribly un-peelable sticky stuff that stuck the mirror on.
 |
| Best done with a hair dryer and chisel |
Once all the stripping agents were applied and it was painted white, the last application was this stuff that gave it an antiquey sort of finish. The next step was to cover up the background where the mirror was. I considered many different options: wall paper, contact paper, paint and stencils, but I settled on applying fancy paper with decoupage.
 |
| Pretty paper bought online from Paper Source |
 |
| I would say that the paper is my least favorite part. I love the design but I was sloppy in its application. I would suggest using a squeegy of some sort to eliminate bubbling. |
I then (with a lot of muscley help) moved the cabinet back inside after its long winter in the garage. I drilled in all the little bits and bobs to attach the doors and put the glass back in.
And then I got to put on the wee finishing touches that made it ALL WORTH IT. The knobs!
The blue crystal knobs are for the bottom cabinet and three brass birds for the top are from Cost Plus World Market.
Even though (after all this work) I don't feel super good about putting in all these lovely breakable dishes while the kids are still climby and destructive, I did put in the sugar bowl that I bought myself for Christmas from Anthropology.
I'm so happy I accomplished such a big undertaking, mostly all by myself. I set out to get a china cabinet and that is what I got....with LOTS of trial and error.
Final cost was probably $250. I think that I could have finished this in a week or two if I didn't have to work around two small children's nap times. It was pretty limiting. I also think that if I wasn't working in a freezing cold garage in Seattle during the winter, it might have gotten done a tad earlier. None of that matters though, now that I have the finished product beaming from my dining room.
*sigh* I love my Chinese Cabinet.


No comments:
Post a Comment